# Tuya T5AI Pixel LED Demos
> **Project in Progress!** Welcome to follow our GitHub repository: https://github.com/tuya/TuyaOpen
## Project Background
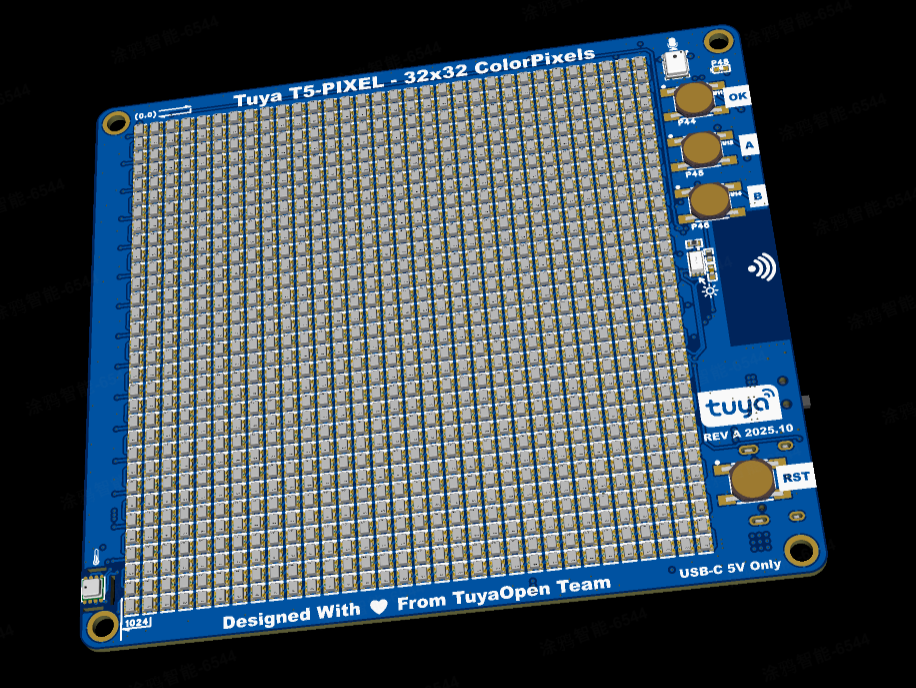
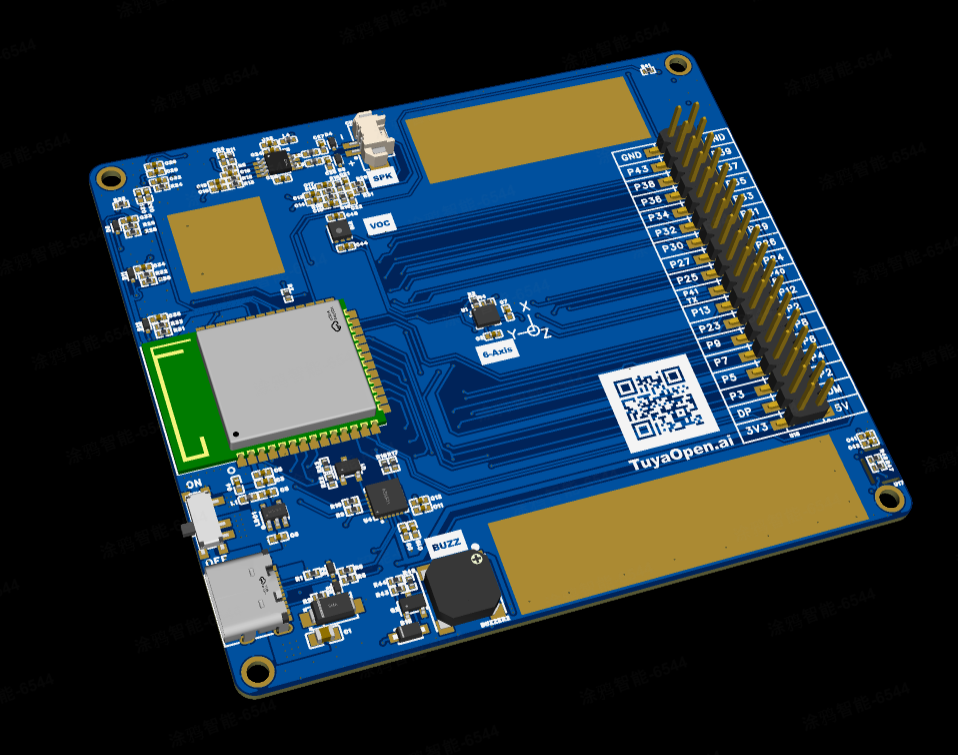
**Tuya-T5-Pixels** is an open-source high-density compact pixel display project based on the TuyaOpen framework. It features a 32x32 LED pixel matrix (1024 WS2812 RGB LEDs) combined with the Tuya T5 WiFi/Bluetooth chip module, offering full open-source hardware and software from PCB design to application code.
### Key Hardware Features
- **1024 full-color RGB LEDs** (WS2812) in 32x32 matrix
- **Multi-sensor support:** Temperature/Humidity/Pressure (BME280), VOC air quality (SGP41), ambient light (BH1750), 6-axis accelerometer/gyroscope (BMI270)
- **Audio I/O:** MEMS microphone + speaker with hardware echo cancellation
- **User interface:** 3 user buttons, USB-C power, dual debug UART (CH342F)
- **Connectivity:** WiFi/Bluetooth via Tuya T5 module, IoT app control
- **Size:** 85mm × 75mm compact design
> ⚠️ **Brightness Recommendation:**
> Do not set the LED global brightness (such as the `BRIGHTNESS` parameter) to maximum. Given the 32×32 high-density pixel array (1024 LEDs), full brightness will cause significant heating and may result in overcurrent or hardware damage.
> **Recommended brightness is around 10%** (e.g., `BRIGHTNESS = 0.1` or lower, default 5% in example code), which ensures good visual appearance while avoiding overheating and excessive power consumption.
### Creative Use Cases
- **AI Voice Weather Display:** Voice-activated weather queries with pixel art icons
- **Desktop Pixel Clock:** Network-synced time display with brightness control
- **Open-source Pixel Canvas:** Real-time drawing via mobile app, AI-generated pixel art support
### Resources
- **Documentation:** https://tuyaopen.ai/zh
- **GitHub Repository:** https://github.com/tuya/TuyaOpen
---
This folder contains several demonstration applications showcasing the capabilities of the 32x32 LED pixel matrix display on the Tuya T5AI Pixel development board. All demos utilize the Board Support Package (BSP) API implemented in `boards/T5AI/TUYA_T5AI_PIXEL/board_pixel_api.h` for pixel display operations.
## Overview
The demos demonstrate various visual effects, animations, and interactive features using the 1024-pixel (32x32) LED matrix. The BSP provides a unified API for:
- Pixel device initialization and management
- HSV to RGB color conversion
- Matrix coordinate to LED index mapping
- Frame-based drawing operations
- Text rendering with multiple fonts
- Bitmap and GIF animation support
## Building the Projects
> **Recommendation:** For detailed environment setup, compilation, and flashing steps, please refer to the TuyaOpen official documentation:
> - [Environment Setup](https://tuyaopen.ai/docs/quick-start/enviroment-setup)
> - [Project Compilation](https://tuyaopen.ai/docs/quick-start/project-compilation)
> - [Firmware Burning](https://tuyaopen.ai/docs/quick-start/firmware-burning)
### Prerequisites
- TuyaOpen SDK environment configured (see "Environment Setup" above)
- Terminal with bash shell support
- Target board: **TUYA_T5AI_PIXEL**
### Quick Build and Flash Workflow
1. **Navigate to TuyaOpen SDK root directory and export environment variables**
```bash
cd /path/to/TuyaOpen
. ./export.sh
```
2. **Navigate to the project directory**
```bash
cd apps/tuya_t5_pixel
```
3. **Project configuration** (Select hardware platform TUYA_T5AI_PIXEL on first build)
```bash
tos.py config
# Interactively select TUYA_T5AI_PIXEL development board
```
4. **Build the project**
```bash
tos.py build
```
5. **Flash firmware to device**
> For flashing, it is recommended to use USB/UART method. See the official [Flashing Tutorial](https://tuyaopen.ai/docs/quick-start/firmware-burning)
```bash
# Typical command (using USB method as example, adjust COM port and parameters as needed)
tos.py flash
```
Or use the official TuyaOpen flashing tool. See the documentation above for specific parameters.
---
Common demo builds (execute compilation directly after step 3):
- Build `tuya_t5_pixel_demo` → Default demo
- Build `tuya_t5_pixel_sphere_effect` → 3D sphere animation
- Build `tuya_t5_pixel_mic_spectrum_meter` → Microphone spectrum
- Build `tuya_t5_pixel_simple_shapes` → Simple primitive rendering
- Build `tuya_t5_pixel_bongocat_kb` → Keyboard event-driven pixel animation
- Build `tuya_t5_pixel_weather` → Weather information display (requires UUID and AUTHKEY configuration)
To build other targets or specify a demo, adjust the corresponding configuration under `apps/tuya_t5_pixel/`.
## Available Demos
# Demo 1. tuya_t5_pixel_demo
**Description:** A comprehensive demo featuring multiple animation effects, pixel art animations, and interactive controls.
**Capabilities:**
- **Animation Effects:**
- Scrolling text with rainbow colors
- Breathing color effects (red, green, blue cycles)
- Ripple effects with water-like animations
- 2D wave effects with color gradients
- Snowflake patterns with rotation
- Scan animations (column and row scanning)
- Breathing circle effects
- Running light effects
- Color wave effects
- **Pixel Art Animations:** 10 pre-loaded pixel art animations including cats, Mario characters, and various memes
- **Sand Physics Demo:** Interactive particle physics simulation controlled by accelerometer (BMI270 sensor)
- **Interactive Controls:**
- OK Button: Cycle through animations, toggle loop mode
- A Button: Switch between pixel art animations
- B Button: Play buzzer melodies, activate sand physics demo
- **Buzzer Integration:** Plays startup melody and "Twinkle Twinkle Little Star"
**Hardware Used:**
- 32x32 LED pixel matrix (1024 pixels)
- 3 buttons (OK, A, B)
- Buzzer
- BMI270 accelerometer/gyroscope sensor
# Demo 2. tuya_t5_pixel_sphere_effect
**Description:** A 3D rotating sphere visualization with audio-reactive rotation speed.
**Capabilities:**
- **3D Sphere Rendering:** Projects a 3D sphere onto the 2D LED matrix with proper perspective
- **Rotation Animation:** Smooth rotation around multiple axes
- **Audio Reactivity:** Rotation speed responds to audio input (microphone)
- **Color Gradients:** UV-mapped color gradients on the sphere surface
- **Interactive Controls:** Button controls for rotation speed and mode switching
**Hardware Used:**
- 32x32 LED pixel matrix
- Microphone input
- Buttons for control
# Demo 3. tuya_t5_pixel_mic_spectrum_meter
**Description:** Real-time audio spectrum analyzer displaying frequency bands on the LED matrix.
**Capabilities:**
- **FFT Analysis:** Performs Fast Fourier Transform on 16kHz audio input
- **8-Band Spectrum Display:** Visualizes 8 frequency bands, each 4 pixels wide
- **Real-time Visualization:** Updates at high frame rate for smooth spectrum display
- **Color Coding:** Different colors for different frequency bands
- **Audio Processing:** Handles 16-bit PCM audio with ring buffer management
**Hardware Used:**
- 32x32 LED pixel matrix
- Microphone input (16kHz mono audio)
# Demo 4. tuya_t5_pixel_simple_shapes
**Description:** A simple demonstration of basic drawing primitives using the BSP frame API.
**Capabilities:**
- **Drawing Primitives:**
- Filled boxes in various colors
- Circles (filled and outline)
- Lines
- Text rendering with different fonts
- **Frame-based Rendering:** Uses the BSP frame API for efficient drawing
- **Color Palette:** Demonstrates all 32 predefined colors
- **Font Showcase:** Displays text using different font sizes
**Hardware Used:**
- 32x32 LED pixel matrix
# Demo 5. tuya_t5_pixel_bongocat_kb
**Description:** Keyboard event-driven pixel art animation demo (Bongo Cat + Wooden Block), supporting real-time control of Bongo Cat and wooden block animations via serial keyboard events.
**Capabilities:**
- **Dual Mode Animations:**
- **Bongo Cat Mode:** Displays 3-frame cute cat animation
- Key UP (0x00): Randomly shows frame 1 or frame 3
- Key DOWN (0x01): Shows frame 2 (hands up)
- **Wooden Block Mode:** Displays 5-frame wooden block animation (32x25 pixels, bottom-aligned)
- Key UP (0x00): Shows frame 0 (up position)
- Key DOWN (0x01): Shows frame 4 (down position, 5th frame)
- **Serial Communication:** Receives commands via UART0 (115200 baud)
- 0x00: Key UP event
- 0x01: Key DOWN event
- All received data is echoed in hexadecimal format (for debugging)
- **Mode Switching:** Use OK button to switch between Bongo Cat and Wooden Block modes
**PC Keyboard Event Tool:**
- **Location:** `apps/tuya_t5_pixel/tuya_t5_pixel_bongocat_kb/pc_kb_event/`
- **Function:** Python script monitors PC keyboard events and sends them to the development board via serial port
- **Usage:**
1. Install dependencies:
```bash
cd apps/tuya_t5_pixel/tuya_t5_pixel_bongocat_kb/pc_kb_event
pip install -r requirements.txt
```
2. Configure serial port:
- Edit `key_event.py`, modify the `SERIAL_PORT` variable to match your serial port device name
- Windows: `'COM14'` etc.
- Linux: `'/dev/ttyUSB0'` etc.
- macOS: `'/dev/cu.usbserial-*'` etc.
3. Run the script:
```bash
python key_event.py
```
4. Press any key to see keyboard events sent to the development board
5. Press Ctrl+C to exit the program
- **Notes:**
- The script occupies the serial port; close it before flashing firmware
- Select the Tuya T5's **flashing serial port** (not the debug serial port)
- The script sends 2-byte commands: 0xA0 0x00 (Key UP) and 0xA0 0x01 (Key DOWN)
**Hardware Used:**
- 32x32 LED pixel matrix (1024 pixels)
- OK button (mode switching)
- UART0 serial port (115200 baud)
**Serial Command Format:**
- 2-byte commands with start byte
- `0xA0 0x00`: Key UP event
- `0xA0 0x01`: Key DOWN event
- All received data is echoed in hexadecimal format: `RX: 0xXX 0xYY ...`
# Demo 6. tuya_t5_pixel_weather
**Description:** Weather information display application that fetches weather data from Tuya cloud services and displays it on the pixel screen.
**Capabilities:**
- **Weather Information Display:**
- Current temperature and feels-like temperature
- Today's high/low temperatures
- Humidity percentage
- Wind speed and direction
- Air Quality Index (AQI)
- Time and date (with timezone support)
- **Weather Icons:** 16x16 pixel weather icons displayed in the top-right corner
- **Page Cycling:** Automatically cycles through different weather information pages
- **WiFi Status Display:** Shows WiFi connection animation on startup, switches to weather pages after MQTT connection
- **Error Handling:** Displays user-friendly messages when weather data is unavailable
**Configuration Requirements:**
> ⚠️ **Important:** This demo requires Tuya IoT platform authorization code configuration before use
>
> 1. **Edit configuration file:** `apps/tuya_t5_pixel/tuya_t5_pixel_weather/include/tuya_config.h`
>
> 2. **Configure the following parameters:**
> - `TUYA_OPENSDK_UUID`: Device UUID required for SDK authentication
> - `TUYA_OPENSDK_AUTHKEY`: Authentication key required for secure communication
>
> 3. **Obtain authorization code:**
> - Product creation and PID generation: https://developer.tuya.com/cn/docs/iot-device-dev/application-creation?id=Kbxw7ket3aujc
> - Authorization code acquisition: https://tuyaopen.ai/docs/quick-start#get-tuyaopen-license
>
> 4. **Location Configuration:** Set device location information in the Tuya App to obtain accurate weather data
> - Use Tuya App to bind the device
> - Set device location (city/region) in the App
> - Location information is used to obtain accurate weather data
>
> **Warning:** Failure to configure correct UUID and AUTHKEY will prevent the device from connecting to Tuya cloud servers, and weather data will be unavailable.
## Board Support Package (BSP)
All demos utilize the BSP API implemented in:
- **Location:** `boards/T5AI/TUYA_T5AI_PIXEL/`
- **Header:** `board_pixel_api.h`
- **Implementation:** `board_pixel_api.c`
### Key BSP Functions Used:
- `board_pixel_get_handle()` - Initialize and get pixel device handle
- `board_pixel_matrix_coord_to_led_index()` - Convert 2D (x,y) coordinates to LED index
- `board_pixel_hsv_to_pixel_color()` - Convert HSV color space to RGB pixel color
- `board_pixel_frame_*()` - Frame-based drawing operations (used in simple_shapes demo)
For more BSP audio, buzzer, and pixel matrix API examples, please refer to:
- `boards/T5AI/TUYA_T5AI_PIXEL/board_buzzer_api.h`
- `boards/T5AI/TUYA_T5AI_PIXEL/board_audio_api.h`
- `apps/tuya_t5_pixel/tuya_t5_pixel_demo/src/tuya_main.c` for demo implementations
## Troubleshooting
### Common Issues
1. **Pixel device not found:**
- Ensure `PIXEL_DEVICE_NAME` is correctly configured
- Verify SPI and pixel LED drivers are enabled
- Check hardware connections
2. **Audio not working:**
- Verify `AUDIO_CODEC_NAME` configuration
- Check microphone connections
- Ensure audio codec is properly initialized
3. **Display issues:**
- Verify pixel count matches (1024)
- Check brightness settings
- Ensure proper power supply
## References
- **BSP Documentation:** See `boards/T5AI/TUYA_T5AI_PIXEL/board_pixel_api.h` for complete API documentation
- **Hardware Documentation:** Refer to Tuya T5AI Pixel board documentation
- **SDK Documentation:** TuyaOpen SDK documentation
## License
Copyright (c) 2021-2025 Tuya Inc. All Rights Reserved.